1. Introduction
KukuFM is India’s leading entertainment platform, producing thousands of audio shows every single day. While audio has always been our core, our community was clamoring for video. But converting an immense, multilingual audio library into engaging video manually would take years. Instead, we built an in-house AI video generation pipeline. In this post, I’ll walk you step-by-step through how we turned raw audio into fully rendered videos using AWS Transcribe, scene chunking, Leonardo.ai for visuals, and MoviePy for final assembly.
2. Why Video, Why Now?
KukuFM already owns one of India’s largest vernacular audio libraries 100 million listeners.
Yet, new-to-internet audiences are spending most of their screen time on short-video apps. If we want our stories to travel further, they need a visual form.
Evaluating “audio-to-video” SaaS vs. Building In-House
“Off-the-shelf” SaaS
English-first pipelines
More than 2$ per minute
Black-box models
Our In-House Pipeline
Supports 7+ Indian languages
< 0.30$ cost per minute
Full control over prompts, styling & QC
3. Background: From Audio to Video
Founded as an audio-only platform, KukuFM scaled to millions of listeners by focusing on regional storytelling (Hindi, Tamil, Malayalam, Telugu, and more).
As video consumption exploded, we quickly realized:
🔊 Audio has the story
🎥 Video has the engagement
Our goal was clear: “Convert every audio show into video automatically.”
4. Core Challenges
Multilingual Content
English models outperform regional‐language models; we needed extra preprocessing for Hindi, Tamil, etc.
Character Consistency
Visually representing the same narrator/character across scenes required a “character reference” workflow.
Long‐Form Narratives
Properly chunking 20–60 minute audios into coherent 5–15 second video scenes took careful LLM prompting + post‐processing.
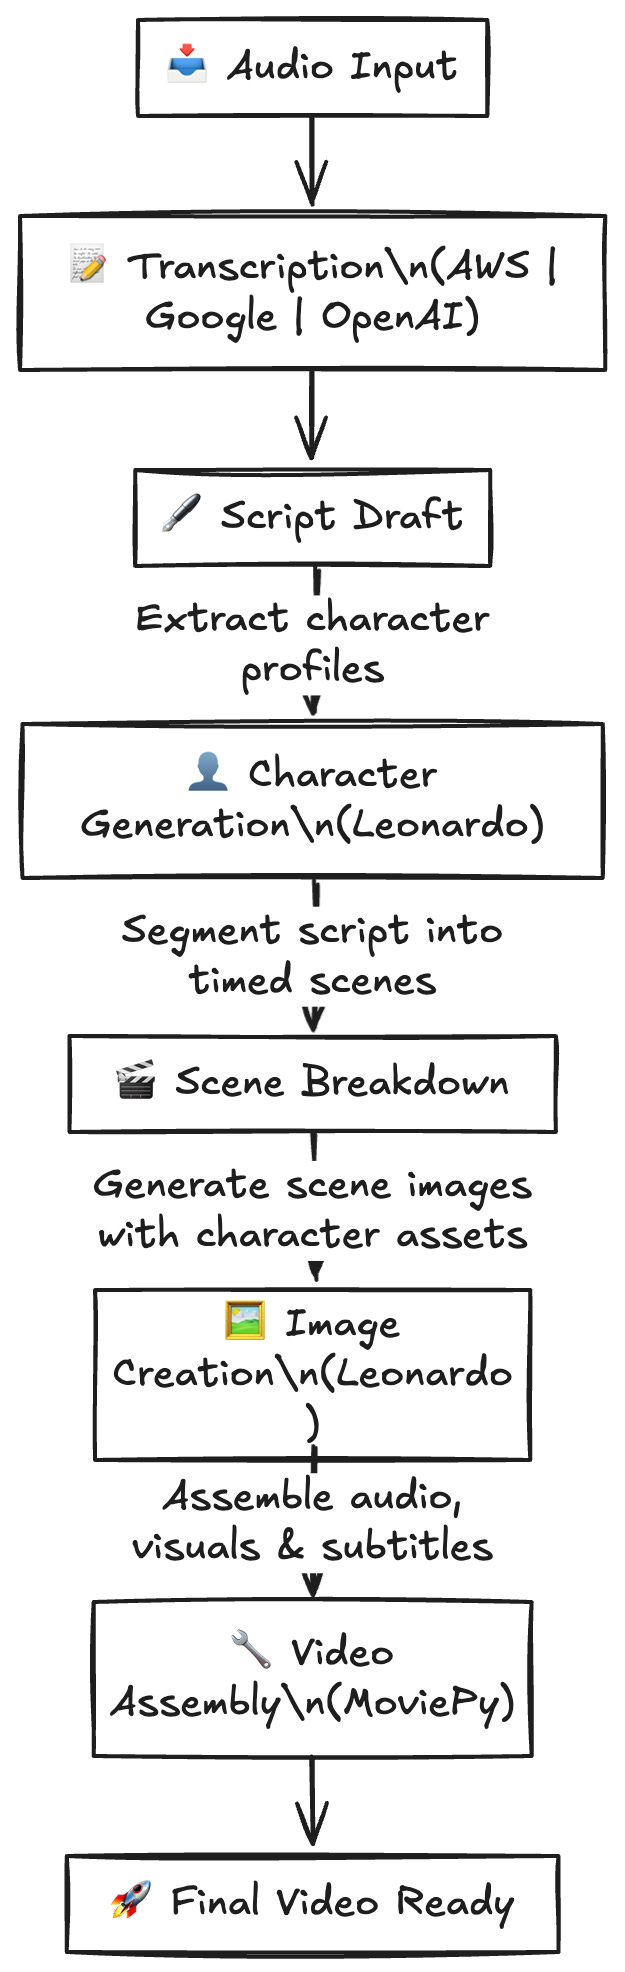
5. Our AI Video Generation Pipeline
flowchart LR
  A(Audio Files) --> B(Transcription)
  B --> C(Scene Segmentation)
  C --> D(Text Normalization)
  D --> E(Generate Scene JSON)
  E --> F(Image Generation @Leonardo)
  F --> G(Video Stitching @MoviePy)
  G --> H(Final MP4)
Step 1: Audio Transcription
We rely on AWS Transcribe for both text and timestamps. It handles English superbly; regional languages require extra care.
Workflow
Upload audio to S3
Kick off a Transcribe job
Store output JSON
Key Considerations
Use vocabulary filters to boost accuracy for proper names and regional idioms.
Set
ShowSpeakerLabelswhen multiple narrators appear.
import boto3, uuid, time

transcribe = boto3.client('transcribe', region_name='us-east-1')

def transcribe_audio(bucket, audio_key, language_code='hi-IN'):
    job_name = f"transcription-{uuid.uuid4()}"
    media_uri = f"s3://{bucket}/{audio_key}"
    role_arn = "arn:aws:iam::123456789012:role/TranscribeS3AccessRole"

    transcribe.start_transcription_job(
        TranscriptionJobName=job_name,
        Media={'MediaFileUri': media_uri},
        MediaFormat=audio_key.split('.')[-1],
        LanguageCode=language_code,
        OutputBucketName=bucket,
        Settings={
            'ShowSpeakerLabels': True,
            'MaxSpeakerLabels': 2,
            'VocabularyFilterName': 'RegionalTermsFilter',
            'VocabularyFilterMethod': 'mask'
        },
        JobExecutionSettings={'DataAccessRoleArn': role_arn}
    )

    while True:
        status = transcribe.get_transcription_job(TranscriptionJobName=job_name)
        if status['TranscriptionJob']['TranscriptionJobStatus'] in ['COMPLETED', 'FAILED']:
            break
        time.sleep(10)

    return status['TranscriptionJob']['Transcript']['TranscriptFileUri']

# Example usage
transcript_uri = transcribe_audio('kukufm-audio-bucket', 'episode123.mp3')
print("Transcript available at:", transcript_uri)
IAM role details: The
TranscribeS3AccessRoleneedss3:GetObject,s3:PutObject,transcribe:StartTranscriptionJob, andtranscribe:GetTranscriptionJobpermissions.
Step 2: AI-Powered Character Extraction
First, let the LLM “read” your entire transcript and spit back a list of characters (with names and image-prompt descriptions). You’ll use these names both to tag speaking parts and to look up the right reference IDs when calling Leonardo.ai.
# 1. Extract characters from the full script
characters = analyze_characters(script_text)
# Example result:
# [
#   {"name": "Dhiren", "prompt": "Dhiren is a confident middle-aged man..."},
#   {"name": "Priya",  "prompt": "Priya is a young woman with..."},
#   ...
# ]
character_names = [c["name"] for c in characters]
Step 3: AI-Powered Scene Segmentation & Chunking
Split your word-level transcript (with AWS Transcribe timestamps) into ~500-word chunks and feed each chunk plus character_names into your “scene analyzer.” The model will:
🔍 Preserve every word exactly (no edits)
⏱ Enforce ≤12 s per scene (~30 words max)
🎭 Tag each scene with one of your known characters (or leave blank for environment)
🎨 Produce a ≥50-word visual description (camera, lighting, setting, etc.)
# 2. Break the transcript into 500-word chunks
chunks = chunk_transcript(transcript_chars, size=500)

all_scenes = []
for chunk in chunks:
    scenes = analyze_scenes(
        transcript_chunk=chunk,
        character_list=character_names
    )
    all_scenes.extend(scenes)
Here’s a tightened, de-duplicated flow—each step has its own focus, and you’ll only see the scene-object JSON spec once in Step 5:
Step 2: AI-Powered Character Extraction
Let the LLM “read” your entire transcript and return a list of characters (with names + image-prompt descriptions). You’ll use these names to tag speaking parts and to look up the right reference IDs in Leonardo.ai.
# 1. Extract characters from the full script
characters = analyze_characters(script_text)
# Example:
# [
#   {"name": "Dhiren", "prompt": "Dhiren is a confident middle-aged man…"},
#   {"name": "Priya",  "prompt": "Priya is a young woman with…"},
#   …
# ]
character_names = [c["name"] for c in characters]
Step 3: AI-Powered Scene Segmentation & Chunking
Break your word-level transcript (with AWS Transcribe timestamps) into ~500-word chunks and feed each chunk plus character_names into your “scene analyzer.” The model will:
🔍 Preserve every word exactly (no edits)
⏱ Enforce ≤12 s per scene (~30 words max)
🎭 Tag each scene with one of your known characters (or leave blank for environment)
🎨 Generate a ≥50-word visual description (camera, lighting, setting, action)
# 2. Chunk the transcript
chunks = chunk_transcript(transcript_chars, size=500)

all_scenes = []
for chunk in chunks:
    scenes = analyze_scenes(
        transcript_chunk=chunk,
        character_list=character_names
    )
    all_scenes.extend(scenes)
Step 4: Text Normalization & Timestamp Alignment
Normalize problematic Unicode so subtitles never glitch, then map each scene’s voiceover back to AWS Transcribe’s timestamps to compute perfect durations.
NORMALIZE = {
    'ड': 'ड़', 'ढ': 'ढ़', 'क': 'क़', 'ख': 'ख़',
    'ग': 'ग़', 'ज': 'ज़', 'फ': 'फ़', 'य': 'य़'
}

def normalize_text(s):
    return ''.join(NORMALIZE.get(ch, ch) for ch in s)

# Example:
# Original:   "क्विज़ के नियम बताए गए हैं"
# Normalized: "क़्विज़ के नियम बताए गए हैं"
For each scene:
Find the first/last word indices in the transcript.
Calculate
duration = end_time_last – start_time_first.If there’s a gap before the next word, add it as a “pause” and prefix the subtitle with “⏸️ ”.
Step 5: Scene-Object Structure
After chunking and timing, each scene is represented as:
[ // only shown once!
  {
    "id": "UUID-string",
    "scene": "Short title",
    "visual": "Detailed Leonardo.ai prompt",
    "duration": 8.5,
    "character": "Dhiren",
    "voiceover": "मुझे अभी अभी पता चला है…"
  },
  {
    "id": "another-UUID",
    "scene": "Environment shot",
    "visual": "Wide shot of a busy street at sunset…",
    "duration": 6.2,
    "character": "",
    "voiceover": "…"
  }
]
Step 6: Image Generation with Leonardo.ai
Once you have your scenes array and your list of character references (each with its Leonardo-id character generated with leonardo and metadata)
prompt: thescene["visual"]textinit_characters_id: the full list of character records you fetched/created earliercurrent_character: the scene’scharactername (so the service can pick the right reference ID)
Then you poll for the final URL or you can use webhook also
from app.services.leonardo_service import LeonardoAIService
import os, asyncio

async def render_scenes(scenes: List[Dict], character_refs: List[Dict]):
    # 1. Instantiate the service
    leo = LeonardoAIService(api_key=os.getenv("LEONARDO_API_KEY"))

    frames = []

    # 2. For each scene, kick off a generation
    for scene in scenes:
        gen = await leo.generate_image(
            prompt=scene["visual"],
            width=1080,
            height=1920,
            # ← your list of all character entries from step 2
            init_charatcers_id=character_refs,
            # ← tells Léo which character to focus on
            current_character=scene["character"]
        )

        # 3. Poll until the image is ready
        result = await leo.poll_generation_status(gen["generation_id"])
        image_url = result["url"]

        frames.append({
            "scene_id": scene["id"],
            "character_ref_id": gen["saved_init_id"],  # the Leonardo reference we used
            "url": image_url
        })

    return frames

# Example usage
frames = asyncio.run(render_scenes(all_scenes, characters))
init_charatcers_idis your list of{ id, name, metadata }objects from your initial character-extraction step.current_characterensures Leonardo picks the right face/style each time.saved_init_idis returned so you know which reference it actually used.
With this in place, every time your scene analyzer tags “Dhiren,” Leonardo.ai will consistently reuse that same Dhiren appearance—no drift, no guesswork.
Step 6: Stitching Everything with MoviePy
from moviepy.editor import (
    ImageClip, AudioFileClip, TextClip,
    CompositeVideoClip, concatenate_videoclips
)
from concurrent.futures import ThreadPoolExecutor

def make_clip(scene):
    img = ImageClip(f"frames/{scene['id']}.png").set_duration(scene['duration'])
    audio = AudioFileClip(f"audio_chunks/{scene['id']}.mp3")
    subtitle = (
        TextClip(scene['voiceover'], fontsize=24, method='caption', align='center')
        .set_duration(scene['duration'])
        .set_position(('center', 'bottom'))
    )
    return CompositeVideoClip([img, subtitle]).set_audio(audio)

with ThreadPoolExecutor(max_workers=8) as pool:
    clips = list(pool.map(make_clip, scenes))

final = concatenate_videoclips(clips, method="compose")
final.write_videofile(
    "output/final_video.mp4",
    codec="libx264",
    fps=24,
    threads=8,
    preset="medium"
)
6. Tech Stack & Infrastructure
Transcription: AWS Transcribe
LLM & Chunking: OpenAI, Claude, Gemini
Normalization & Utilities: Python 3.10
Image Generation: Leonardo.ai (character referencing)
Video Assembly: MoviePy + FFmpeg
Storage: AWS S3 + DynamoDB (scene metadata)
Orchestration: AWS Step Functions
7. Lessons Learned & Best Practices
Pre-define vocabularies for regional names to boost Transcribe accuracy.
Monitor chunk durations programmatically don’t trust prompts alone.
Normalize aggressively to avoid subtitle mismatches.
Cache character references in Leonardo to speed up generation.
Parallelize audio slicing and frame creation to handle thousands of scenes per hour.
8. Future Improvements
👉 Adaptive scene length: Use audio pacing and emotion to vary shot durations.
👉 Dynamic text styling: Animate subtitles based on sentiment.
👉 Model fine-tuning: Train a custom transcription model for Indian languages.
9. Conclusion
By marrying AWS Transcribe with LLM-powered chunking, Unicode normalization, Leonardo.ai for visuals, and MoviePy for assembly, we’ve built a fully automated pipeline that turns pure audio into polished videos—at scale. Whether you’re a podcast network, an edtech platform, or an entertainment studio, this approach can unlock new audiences and breathe life into your audio archives.
Ready to try it?
Grab your audio.
Follow the steps above.
Share your first AI-powered video!